Skyware users must have an email service set up to facilitate the sending of any correspondence emails (for example, reservation or confirmation emails) created within Skyware to your customers. This allows you to generate the body of the required email(s) within Skyware yet send the emails as if they were being created through the email service. This email service account may be with any service provider outside of Skyware, if the provider allows it - often, such service is only provided with PAID/PURCHASED accounts (mailboxes). For any outside email account, access permission for Skyware to use it needs to be granted within the service account, rather than in Skyware. (This requires that you enable SMTP Authorization online). Thus the first step in using an email service account with Skyware is to enable Skyware's access to the email account you wish to use. Email hosting server accounts may be though providers such as GoDaddy, IONOS, Bluehost, Microsoft 365 or Gmail. Once permission has been established within the email account, setting it as the email service is performed in Skyware using the Web/Email tab of the Property Definition screen.
Note: With Gmail, this may be a free Gmail acount or a purchased Gmail workstation account. Like any other email service It does require information and changes in permission settings from Gmail, which should be completed first. Please see our help topic How to set up a Gmail account with Skyware for guidance specific to using Gmail for this purpose.
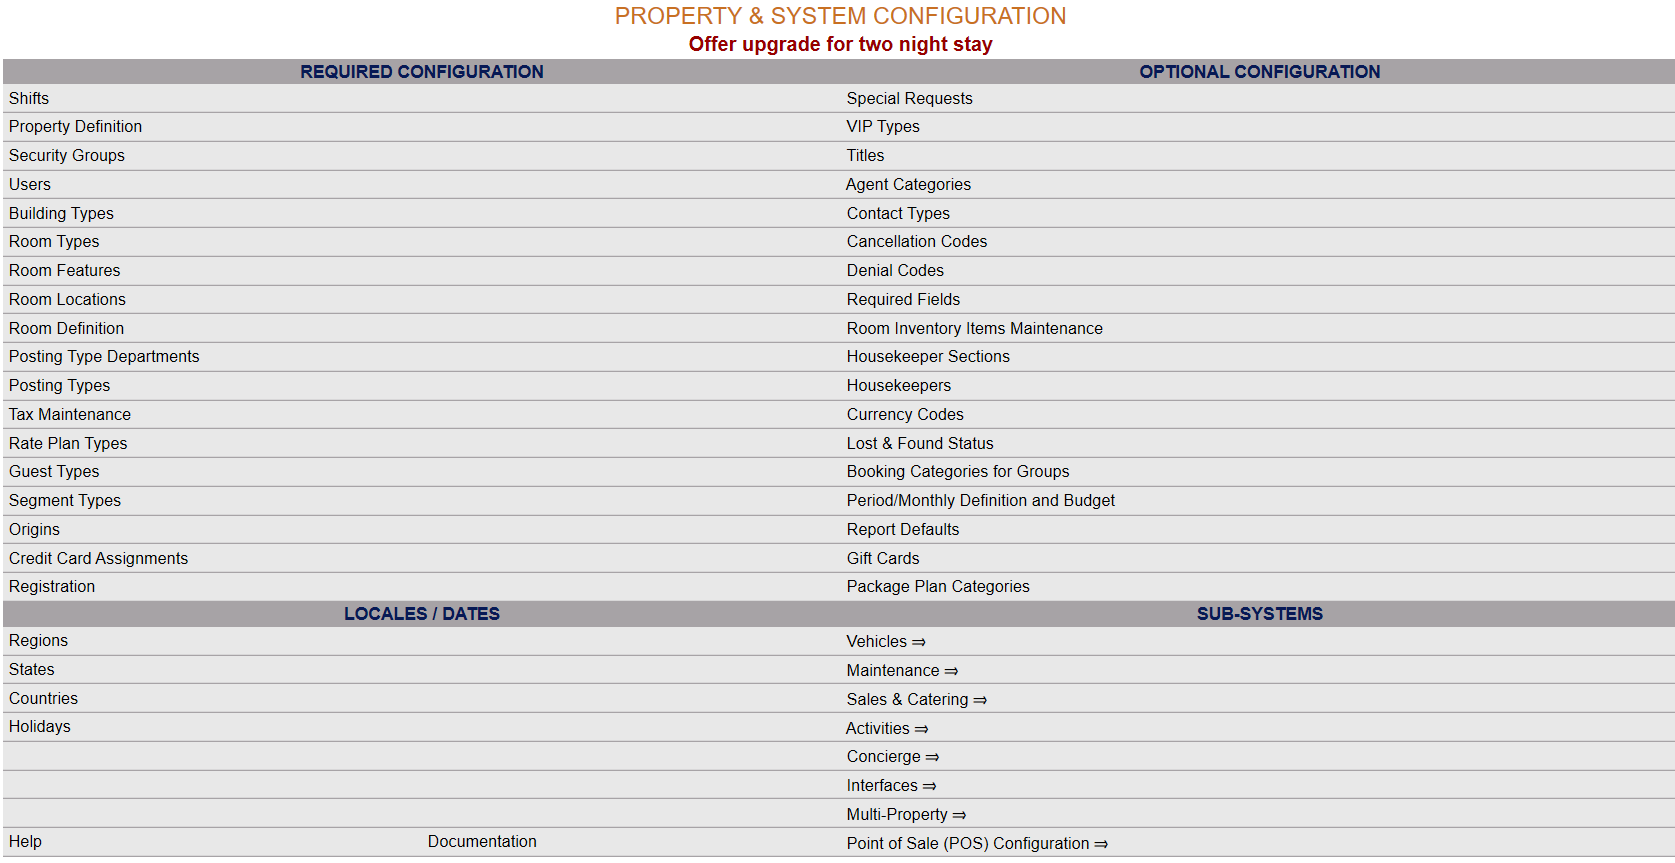
Access permission for Skyware needs to be granted within the email account (mailbox).
1. Ensure that you are logged in to the correct email account.
2. Open the email account information screen.
3. Access the Admin Center: Use the Manage your Google Account button (in Gmail), Admin button (in GoDaddy, Microsoft 365) or equivalent button to open the section to gain access to the permission settings.
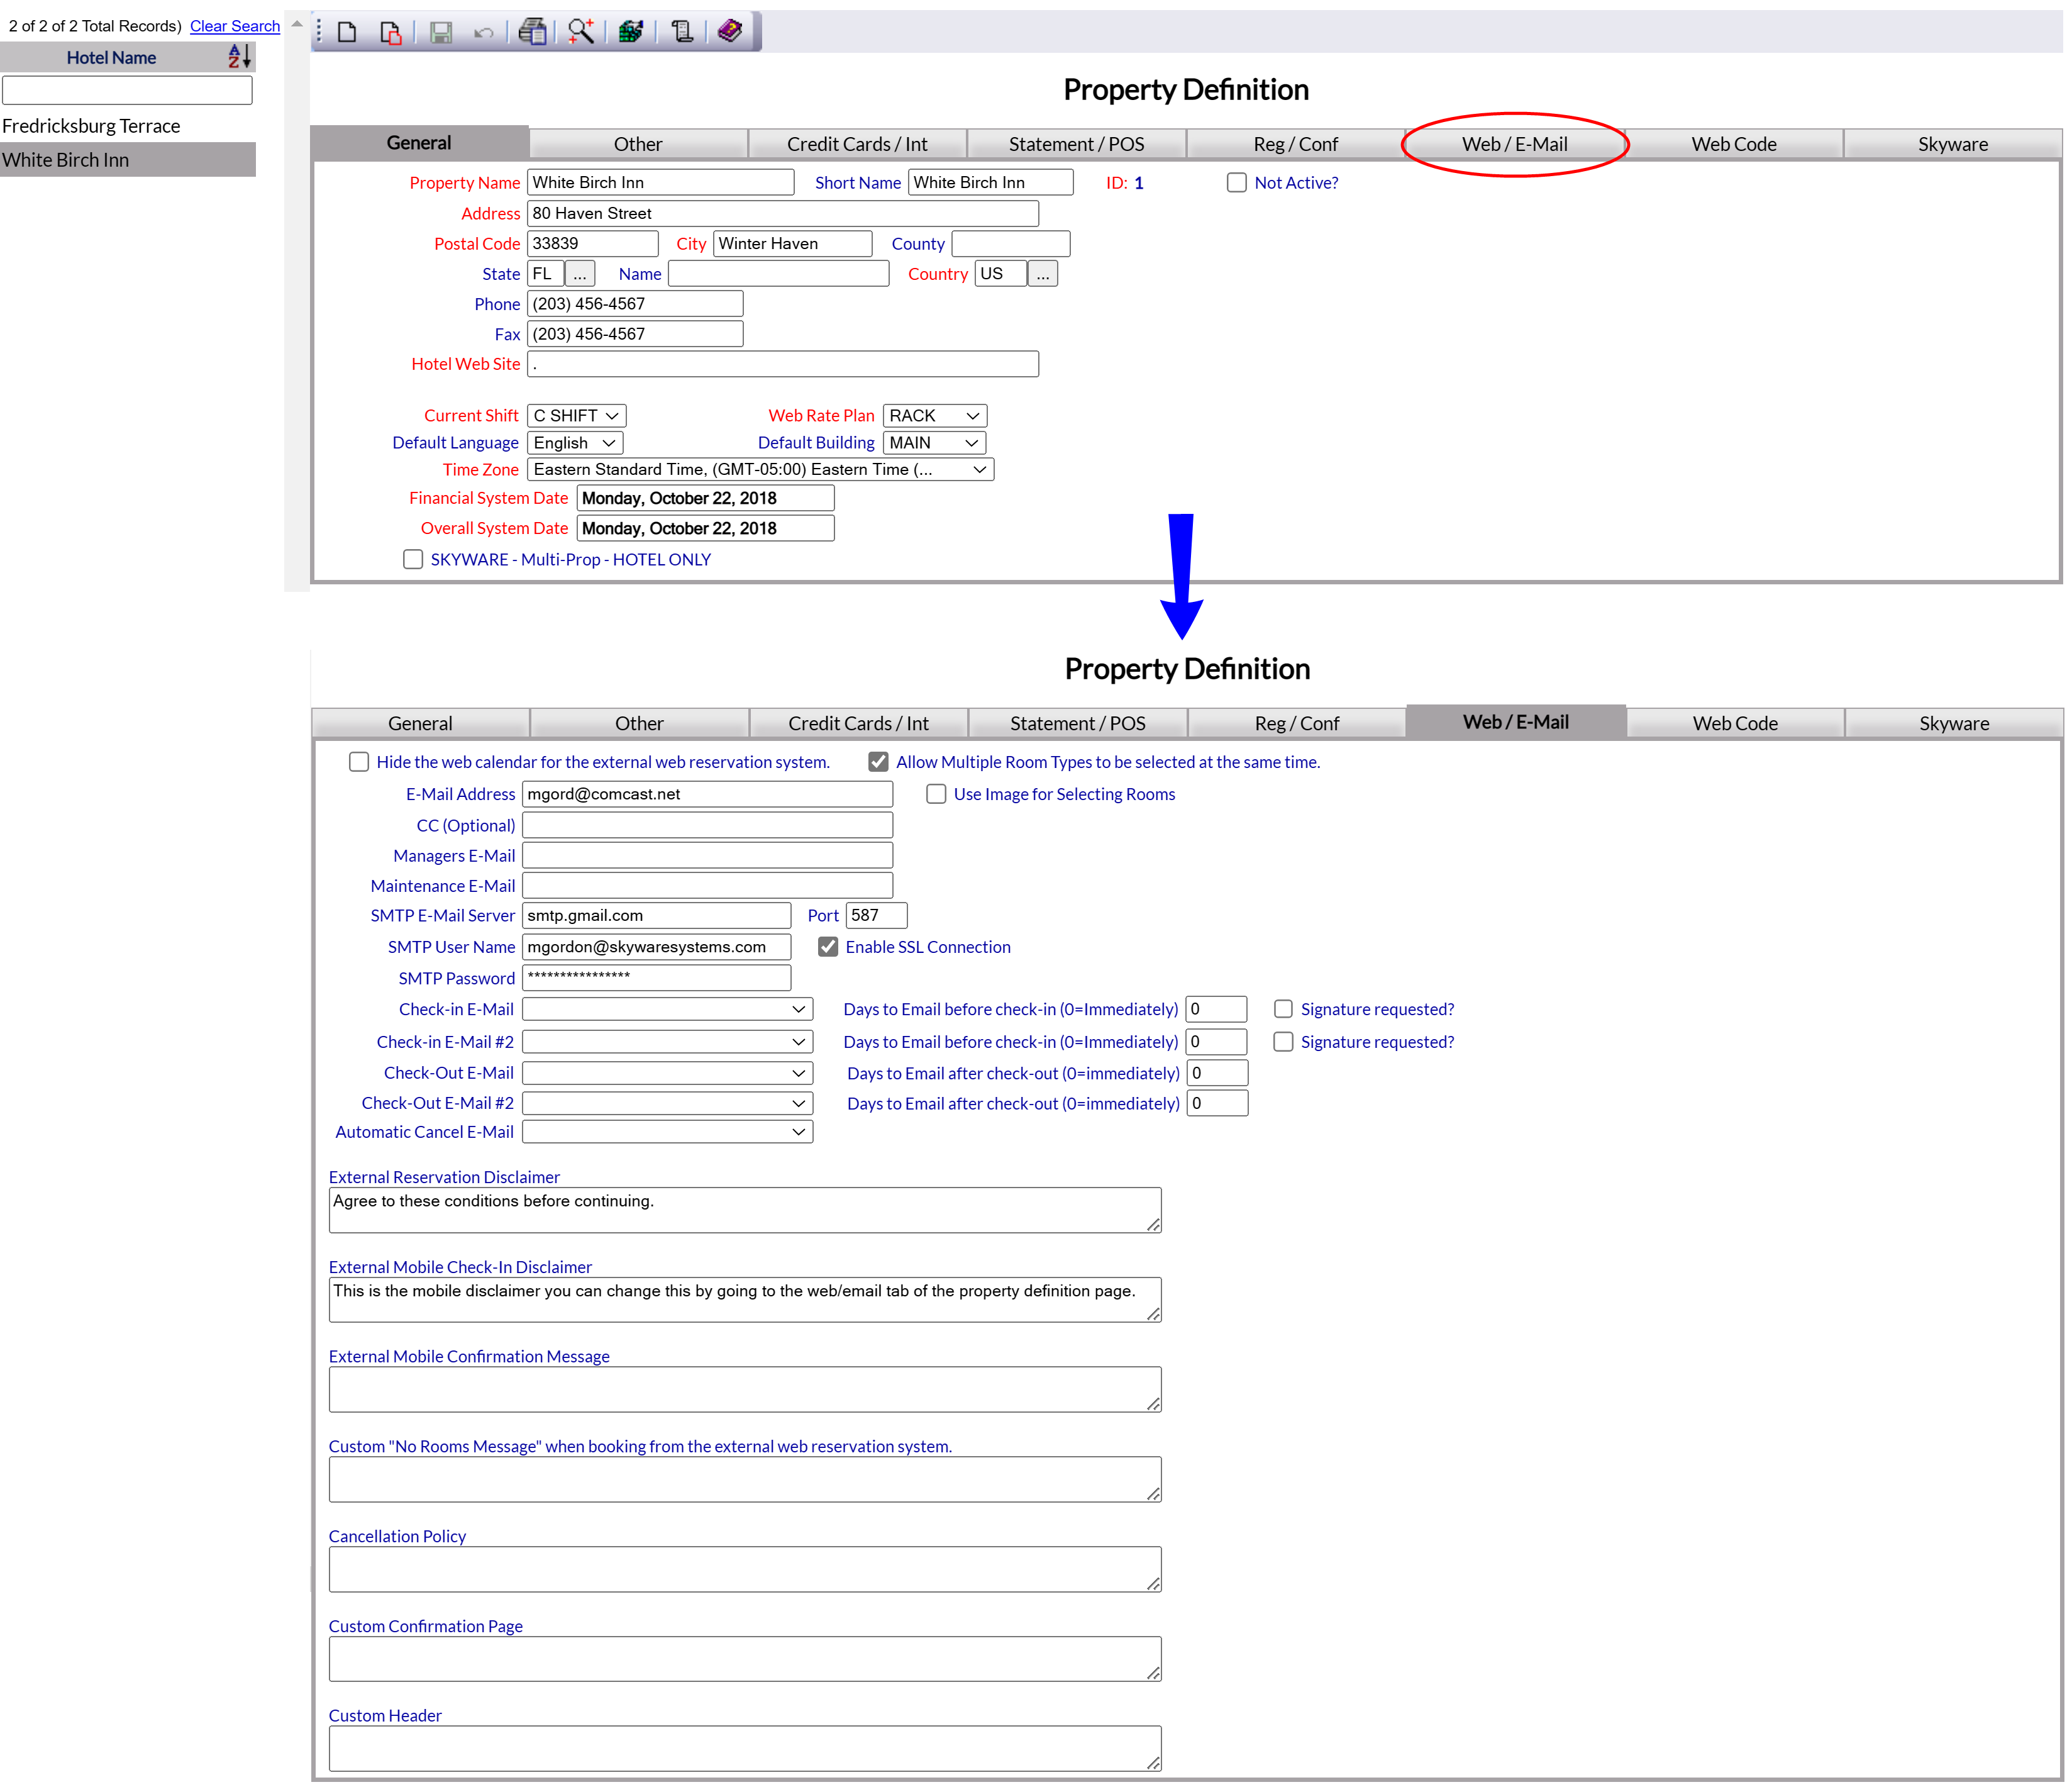
Skyware uses SMTP to send email messages (also known as authenticated SMTP submissions or SMTP AUTH). You must therefore ALLOW (enable) SMTP AUTH with your email to be able to use the email address to SEND email messages rather than to simply receive. To use SMTP AUTH, you may need to disable security defaults to allow Skyware access.
4. Access/View your Security Defaults.
5. Enable SMTP AUTH if it is not currently enabled. Often this is automatically disabled by default.
The exact name/phrase for this differs between email service providers, and may or may not be labeled as SMTP Authorization (in Gmail, this is called less secure app access - you must turn ON to enable SMTP authorization).
Note: It is possible that your email provider service does NOT ALLOW you to enable SMTP authorization. If this is the case you will NOT be able to use it for sending any correspondence emails through Skyware.
Click the icon menu option on the left or the breadcrumb link on the right for the Full menu.
This will display the Full menu in a tabular form, with four sections, Registration, Status, Cashier and Other.
Select Other => from the Other section. This will display the Other Front Desk Tasks Menu. The Other Front Desk Tasks menu has 4 sections, Other List 1, Documents, Other List 2 and Web.
Select Managers Screen => from the Other List 2 section. This will display the Managers Commands screen. The Managers Commands screen has two sections, Managers Configuration and Managers Configuration.
Select Configuration => from the Managers Configuration section to be taken to the Property and System Configuration menu. The list of property configuration options are divided into four sections, which are Required Configuration, Optional Configuration, Locales/Dates and Sub-Systems.
Select Property Definitions from the Required Configuration section.
OR: Select Managers Screen from the Quick Menu on the left side of the screen, then select Configuration > Property Definition.
Alternately, you may also be able to select Configuration directly from the Quick Menu, if the menu has been set up to include the Configuration option.
The Property Definition screen display is split into two frames, with the left side of the screen listing the properties and the right side containing the fields you need to complete in order to add or edit the configuration for the property. Ensure that you are viewing the correct property, if multiple properties are listed on the left.
By Default, the General tab will be open when you arrive at the Property Definition screen. There are six more tabs available, the Other tab, the Credit Cards / Int tab, the Statement / POS tab, the Reg / Conf tab, the Web / E-Mail tab and the Web Code tab.
For this purpose you will need to open the Web / E-Mail tab. Click on the tab name to open it.
The fields that you will need to update to use an Email account are the SMTP fields in this tab.
SMTP E-Mail Server: This is the email SERVER that you will be using. This field should be completed for you by default. If not, enter the email server with SMTP as the user ("SMTP.email server", for example "SMTP.gmail.com" or "SMTP.office365.com") here.
Port: The port number must be completed. Again, this field should be completed for you by default. If not, enter "587"
Enable SSL connection: This check box MUST be checked to allow Skyware and the Email server to communicate. By default, it should be checked if the other fields have been completed, but be sure to check.
SMTP User Name: This is the outside email ACCOUNT that you wish to use with Skyware. The email address entered here is the one that Skyware will use for sending out the emails to your customers, meaning the emails they receive will appear to come from this address (for example "Bob@gmail.com).
SMTP Password: This is the password allowing you to use the outside Email with Skyware.
For the free version of Gmail, copy and paste the password that you generated within Gmail into this field (as outlined in the How to set up a Gmail account with Skyware Help Topic).
If you are using the purchased Gmail Workspace or other purchased Email server address, you should simply need to enter the same password that you use for that Email into this field (once you have given Skyware access permission to access the Email).
Once you have completed the SMTP fields, save the changes you have made.
After entering and saving your user name (email address) and password for the email account within Skyware, you will now be able to use it as your email service and send emails generated within Skyware via the email account.
Date Updated October 31, 2024